
Creating a sitemap is an important step in getting your website listed on Google.
Contents of the page
What is a Sitemap?
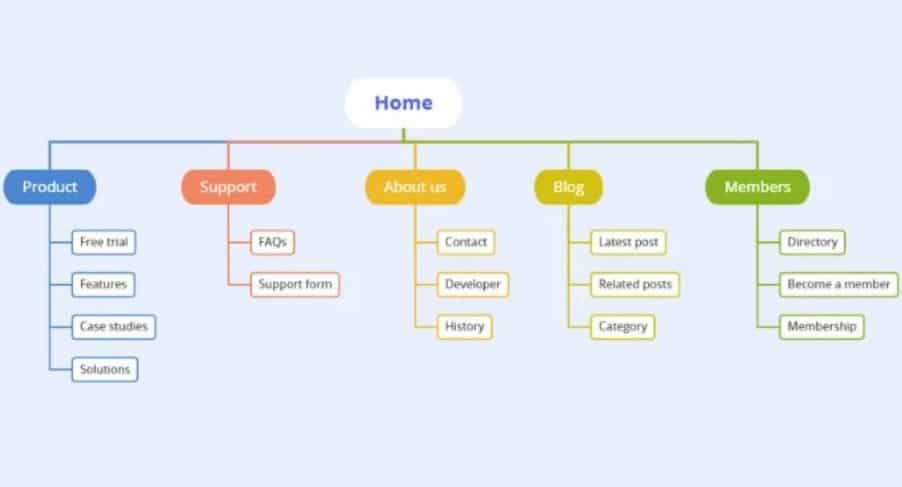
A sitemap serves as a table of contents for web pages, helping search engines like Google understand the structure of your site and index all of your important pages efficiently. For WordPress users, plugins like RankMath and Yoast SEO simple solutions to create and manage these important SEO elements.
In this guide, we will walk through the process of creating a sitemap in WordPress using RankMath and Yoast SEO. We will also cover how to submit your sitemap to search engines and common mistakes to avoid. Our goal is to provide you with a comprehensive guide to help you take your website's SEO to the next level.
How sitemaps help search engines
By submitting a sitemap to search engines make sure they know about every page on your site, especially those pages that are new or rarely covered by links on your site. This is especially important for large sites with many pages, new sites that don't yet have many external links, or sites that contain many isolated or unrelated pages.
However: A sitemap is not a panacea for SEO. It doesn't guarantee that every page on your site will be indexed, but it does help search engines crawl and index your content more efficiently. However, the lack of a sitemap can result in certain parts of your website being overlooked, which in turn can affect your visibility in search results.
Here is more information about sitemaps (from Google)
WordPress plugins
RankMath and Yoast SEO are two of the leading SEO tools on the market, both offering a wide range of features to optimize your website for search engines. One of its highlights is the ability to create a complete and effective sitemap in just a few clicks.
Which plugin to use? We recommend RankMath.
RankMath (recommended)

RankMath is a powerful SEO plugin for WordPress that provides a user-friendly interface to simplify and optimize your SEO efforts, including creating and managing your sitemap. Setting up a sitemap with RankMath is a straightforward process that can help your website be more visible in search results.
Step 1: Install and activate RankMath
Start by installing RankMath on your WordPress website. To do this, go to “Plugins” > “Add New” in the WordPress dashboard and search for “RankMath SEO”. Click “Install Now” and then “Activate.”
Step 2: Set up RankMath
Once activated, RankMath will launch a setup wizard that will guide you through the basic configuration. During this process, you will be asked if you want to enable a sitemap for your website. Confirm this to proceed with sitemap creation.
Step 3: Adjust sitemap settings
Once the basic configuration is complete, navigate to RankMath > Sitemap Settings in your WordPress dashboard. Here you can customize various settings for your sitemap, including:
- Links per sitemap: The number of URLs in a single sitemap file. A smaller number may be helpful if your site is very large.
- Sitemap for articles and pages: Enable sitemaps for your posts and pages to ensure they are indexed by search engines.
- Include media in sitemaps: If you want images or other media elements to appear in the sitemap, make sure this option is enabled.
Step 4: Review your sitemap
After adjusting your settings, you can check your sitemap by going to your website URL and /sitemap_index.xml attach. Example: http://www.ihrewebsite.com/sitemap_index.xml. Here you will find links to all of your site's sitemaps, including posts, pages, and media.
Best practices for sitemap settings in RankMath
- Keep it up to date: Make sure your sitemap is always up to date by adding new content regularly. RankMath automatically updates your sitemap when new content is published.
- Avoid unnecessary URLs: Avoid including pages that do not add value to search engines, such as admin pages, in your sitemap.
- Regular checks: Check your sitemap regularly for errors or issues that could affect your site's indexing.
Yoast SEO

Yoast SEO is another popular plugin for WordPress that will help you improve your SEO efforts. One of the many features of Yoast SEO is the ability to automatically generate a sitemap for your website, which is an essential step in improving your SEO.
Step 1: Install and activate Yoast SEO
To get started with Yoast SEO, you must first install and activate the plugin. From the WordPress dashboard, go to Plugins > Add New, search for Yoast SEO, click Install Now, then click Activate.
Step 2: Access Yoast SEO Sitemap Settings
Once activated, you can find the Yoast SEO settings under “SEO” in the WordPress dashboard. To access sitemap settings, navigate to SEO > General and go to the Features tab.
Step 3: Activate sitemap function
On the Features page, scroll down until you see the XML Sitemaps option. Make sure the switch is set to “On” to enable sitemap functionality.
Step 4: Review and adjust your sitemap
After activating the sitemap feature, Yoast SEO automatically generates a sitemap for your website. To review your sitemap, click the question mark button next to the “XML Sitemaps” option and then click the “View XML Sitemap” link. This will take you to your sitemap, typically located at http://www.ihrewebsite.com/sitemap_index.xml can be found.
Yoast SEO divides your sitemap into different sections, such as posts, pages, and categories, making it easier for search engines to crawl your site. If you want to customize, you can include or exclude specific content types or taxonomies via the Yoast SEO Posts and Taxonomies Settings.
Best practices for sitemap settings in Yoast SEO
- Check regularly: Even with an automatic sitemap, it is important to check it regularly and make sure that all important pages are included.
- Keep your website clean: Remove unnecessary pages from your sitemap by marking them as “noindex” to prevent search engines from indexing low-quality pages.
- Use the categories and tags wisely: Too many irrelevant categories or keywords can bloat your sitemap and hurt your website's SEO.
Submit sitemap to search engines
After you have successfully created your sitemap using RankMath or Yoast SEO, the next step is to submit it to the major search engines.
Google Search Console

Google is the most used search engine in the world and submitting your sitemap to Google Search Console is a must. Here's how to do it:
- Sign in to Google Search Console. Click here
- Select your website. Select the website for which you want to submit the sitemap from the list. If your website hasn't been added yet, you'll need to add and verify it first.
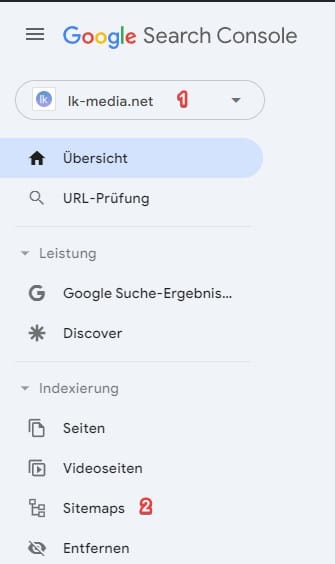
- Go to Sitemaps. In the dashboard you will find the “Sitemaps” menu on the left side.
- Add sitemap URL. Enter the exact path of your sitemap, which you can usually find in RankMath or Yoast SEO. This usually looks like this:
sitemap_index.xml. - Submit sitemap. After you enter your sitemap URL, click Submit. Google will begin processing your sitemap, which may take some time.

Submit sitemap to other search engines
Although Google has the largest share of the search engine market, you should also submit your sitemap to other search engines such as Bing. The process is similar to that of Google Search Console and can be done from the Bing Webmaster Tools dashboard.
Why submitting your sitemap is important
- Improved indexing: By submitting your sitemap, you ensure that search engines are aware of all pages on your website.
- Faster content discovery: New or updated pages are discovered more quickly and included in search results.
- Bug reports: Both Google Search Console and Bing Webmaster Tools provide reports and troubleshooting tools that can help you identify and fix problems on your site.
Common errors and how to fix them
Various issues can arise when creating and submitting sitemaps. Fortunately, most of these are easy to fix. Here are some of the most common errors and how to solve them:
Error: Sitemap not found
- Cause: The sitemap URL was entered incorrectly or the sitemap does not exist in the specified location.
- Solution: Check your sitemap URL. Make sure it has been entered correctly into the search engine tools and that the sitemap actually exists in the specified location on your website.
Error: URLs in the sitemap lead to 404 errors
- Cause: Some URLs in your sitemap lead to pages that cannot be found (404 errors).
- Solution: Check all URLs in your sitemap for typos or outdated links. Remove or update any URLs that result in 404 errors.
Error: Sitemap contains URLs blocked by robots.txt
- Cause: Your sitemap contains URLs to pages that are marked as unindexable in the robots.txt file.
- Solution: Remove the URLs from your sitemap or update your robots.txt file to allow indexing of these pages if you want them to be indexed.
Error: Sitemap is too large
- Cause: Your sitemap exceeds the size limits set by search engines (typically 50 MB and/or 50,000 URLs).
- Solution: If your sitemap is too large, split it into smaller sitemaps. This can be done automatically using plugins like Yoast SEO or RankMath.
Best practices for maintaining your sitemap
- Regular checks: Check your sitemap regularly for errors or warnings in the search engine tools and make appropriate adjustments.
- Update after changes: Update your sitemap every time you make important changes to your website, such as adding or removing pages.
- How to use sitemap plugins: Use sitemap plugins like Yoast SEO or RankMath that automatically update when you add new content or remove existing content.
You can get more help on the Google Sitemaps subpage
Questions/Concerns? Feel free to leave a comment.